Pages

Friday, December 20, 2013

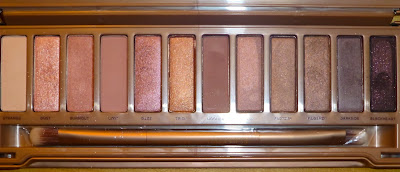
First Impression Review: Urban Decay Naked 3


Hello, fellow beauties!


Christmas is almost here and the stress kicked in today and is in full swing at the moment. Nonetheless, I really wanted to tell you about one of the most exciting releases that 2013 had to offer which is of  course the Naked 3 palette of Urban Decay.
It only hit the stores this week so I don't have a in depth review for you but just my first impressions I gained over the few days I own this baby.


The theme of this palette is rose gold which is also the colour of the case and the writing. I think the rippled design of the lid is an absolute eye catcher!


As usual with the Naked palettes, there is a mixture of matte and shimmery colours, the shimmery ones being the majority. Here we have three matte colours, one light, one medium and one slightly darker. 
The colour pay off is great with the dark colours and good with the lighter ones. I think it's not as good as with the other palettes but still rather impressive. One thing I noticed though, is that many colours have a bit of a fall out, so take care how much you take on you brush or you will sparkle literally everywhere.


Strange: The first colour is a very light and sheer  champagne colour with a matte finish which is great as a base for all the other colours.

Dust: Dust is a wonderful rose gold which looks gorgeous on the lid. This has a major fall out, but it works when you carefully pad it on the lid with a flat brush.

Burnout: Another rose gold but a bit more bronze. It's shimmery as well but more subtle.

Limit: The second matte colour is a matte tulipwood. I think this would work really well with the Naked Basics palette.


Buzz: Yet another rose gold colour but with much more pink undertones than the other ones. The finish is somewhere between Dust and Burnout.

Trick: This is much like Burnout only even more bronze.

Nooner: The last matte eyeshadow. It's an almost taupey brown.

Liar: A metallic greyish brown. This really reminds me of the Maybelline Color Tattoo in On And On Bronze.


Factory: This is a golden, very warm brown which is great in combination with Nooner. All those colours in the last picture make a wonderful smokey eye by the way.

Mugshot: Mugshot is like Liar, only with less rose gold in it. This eyeshadow is lighter than Factory which is curious because usually the colours go darker.

Darkside: A rather cool brown with inly the tiniest bit of shimmer. I initially thought this was a matte one, but if you layer it you actually see the shimmer.

Blackheart: This is a curious one. A very dark brown with red milled shimmer, much like the shimmer in Chanel's Vendetta nail polish. When you look at it in the pen, it is much more red than it actually is. On the skin it is much darker and dramatic.


I really adore this palette! Although it is expensive at 45 €, the quality is amazing. I do think that it is a bit harder to handle than its predecessors, which is mainly due to the fall out of some colours, but it's still a great thing to invest in, especially if you want to experiment with rose gold colours but aren't too sure about them. There's not much rose in the second half of the palette so those of you who don't like rose gold have something to love here as well. My favourites so far are definitely Buzz, Liar and Blackheart and I'm really looking forward to rocking this palette during the festive days.


Hopefully you enjoyed this! Let me know what you think of this baby or if you're hoping for it to lie under your Christmas tree.


Have a great and sparkly rest of the day!
xx

Sunday, December 15, 2013

Advent No. 2 & 3 (oops!): Festive Make-Up Looks


Hello and a happy third advent, my fellow beauties!


You all certainly noticed that I kinda missed my advent post last week. Well, whoopsie! I really apologise but one of my pets died last week and I was really devastated and blogging was one of the last things I thought about.
But as a compensation I made sure to prepare this post with extra love and extra care. I put together three different make-ups that are all suitable for Christmas, may you be celebrating on the 24th or 25th.


1. Gold, Gold, Gold


Almost no colour symbolises Christmas for me like a warm and sparkly gold. I love putting loads of golden ornaments on my Christmas tree so I thought I could repeat this theme in my make-up.
I started off with the Catrice Made to Stay Long Lasting Eyeshadow in Lord of the Blings, which is a very cool-toned, golden cream eyeshadow, on my lid and blended it out into the crease. Over it I put MAC's Naked Lunch which is a light champagne colour with golden undertones to make it look tidier because Lord of the Blings is not a very blendable colour and tends to look patchy. 
Over that one came the golden colour of Sleek's Storm palette which is nameless I fear, but in the picture above it's the third colour from the right in the upper row of the upper palette. It's a warm, very shimmery gold, which I put generously all over the lid and didn't blend up into the crease. Because for that one I chose Urban Decay's Half-Baked, an even warmer gold that may look a little bronze in the light. Due to this effect I adore this for the crease because it intensifies the shadows you want to create.
What remained on my brush went on my lower lash line. 
I then finished the look with a black flick that I intensified with the black eyeshadow of the Storm palette and not too dramatic mascara.
Because everything else was sparkling already, I chose not to wear a blusher and highlighter, but went for The Body Shop's Honey Bronze Bronzing Powder, which gave me a healthy look but calms everything down with its matte finish. 
For the lips I used Maybelline Moisture Extreme 610 Precious Rose, a gorgeous and very natural pink with teeny tiny bits of glitter that you don't really see that much but go well with the theme.


2. Smoke it out!


This is my favourite of the three looks and probably the one I'm actually going for myself. It's more dramatic than the other ones so if you want to keep it more natural this might not be for you but then you might rock this on New Year's Eve.
As a base I used Urban Decay's Pistol eyeshadow which is part of the Naked 2 palette. This is a silver-grey metallic tone and I adore it. In the crease I put Creep, another Urban Decay colour from Naked 1, a black with shimmer particles in it. To calm it all down a bit I chose a bit more subtle colour to go on top of Creep and I took Soap & Glory's Smokey Dokey Lid Stuff palette, the colour Smokin' in particular which is a very dark grey with a shimmer as well but it doesn't show very strongly. 
Additionally to my staple black flick I applied black eyeliner under the eye which I smudged to accentuate the smokey look. I finished the eye make-up with Max Factor's False Lash Effect mascara which is one of the more dramatic mascaras I own.
For the cheeks I chose the beautiful Rose Gold blush by Sleek, I don't think I have to tell you much about this gem. It's basically a wonderful peachy pink, depending on your skin tone, with golden shimmer particles and it looks so nice on literally everyone.
Because there's so much going on already I wanted to take my lips out of focus and put on a nude tone. It's not a Rimmel Apocalips by the way, but a 'new' product by Manhattan, I do believe the companies are actually one? I couldn't explain the exact same product with another name otherwise. Anyways, the colour is called 004 Date Me.


3. The Classic


For the is the ultimate winter make-up. I just could not include a look with a red lipstick, could I?
Because I'm not a fan of a dark lip with almost nothing on the eyes to counteract it, I chose to do a little bit with light colours there. 
On the lid I wear a sheer champagne colour called Innocence and it's out of Sleek's Bad Girl palette. For the crease I took another colour from Soap & Glory's Smokey Dokey quad, this one is called Black Gold. No idea where this name comes from because it's actually a matte grey.
A thick black line is mandatory for me when it comes to dark lips, so here we go and mascara and we're fine.
I again put on my Honey Bronze Powder by TBS because I don't like going without anything on the cheeks at all. 
For the centrepiece of the look, the lipstick, I chose MAC's Russian Red, one of my favourite colours ever, a deep dark red with a matte finish. A big plus with this one is that it's not so drying as other matte lipsticks and is super easy to handle so you don't have to worry about it all night.


For all the looks above I used my Nars Sheer Glow Foundation in Deauville with the Maybelline Fit Me concealer in the colour 20 and the Annayake Translucent Powder. For contouring I used MAC's Harmony Blush.


That is it for my three festive look options! Please tell me in the comments if you liked them and what kind of make-up you are going to wear this Christmas, I'm so excited to know!


Have a wonderful day!
xx


Friday, December 13, 2013

Review: Catrice Ultimate Nail Lacquer, Golden Twenties


Hello, fellow beauties!


I have just a little quickie for you, a review about a nail polish I absolutely fell in love with. 
We're talking about Catrice (again), in particular about their current Limited Edition Feathers & Pearls which is dedicated to the Roaring Twenties which means loads of blacks, golds and reds.

The baby I fell in love with is called Golden Twenties and looks like this:


The colour is a light, cool golden tone which reminds me a lot of the limited edition nail polish Burberry just released. I often find that golden nail polished tend to have red undertones which this one totally lacks. 
It's also super easy to handle. Catrice has brilliant brushes that are broad enough to allow you easily paint your nail with three strokes. It also dries very fast and hassle-free and without going all streaky which is a problem I often have with metallic finishes. You can see a teeny tiny bit of streaks but it's really minimal.


This is what it looks like when painted. Please excuse how my cuticles look, I have a bit of an issue with them at the moment. 
What's also really gorgeous are the engraved flowers on the lid which is part of the LE design. Another thing you just can't beat is the price which is 2,79 €. I mean, how can you beat that? Me likey!

This limited edition will be available until the end of December and probably longer because the stores are always a bit slow to take them away. So if you want a super easy to handle golden nail polish for an amazing price, be quick to get one!


Have a great day, lovelies!
xx


Friday, December 6, 2013

The A/W Beauty Tag


Hey, fellow beauties!


Today I have another tag for you! You know I like doing my tags, don't you? They're just fun to do and although most of the stress at Uni is over, I still have some exams to do this year and need to prepare for them as much as I can.
Which is also the reason this post is uploaded on a Wednesday instead of Tuesday, whoopsies!

What I wanted to do is the Autumn/Winter Beauty Tag (as you probably have guessed already). I stumbled across this over on Marie-Louise's blog, she is a Danish girl I just love so much. She just hit 500 subscribers on bloglovin, you can see she's amazing. 
Congrats again, honey! <3

Let's start!


What is your current go to foundation for A/W 13?
At the moment it's still my MAC Matchmaster foundation. I just love how easy it is to use although it could give me more coverage. I do think it's almost too dark for me now and I'd love to use my Nars Sheer Glow Foundation on a daily base, but it takes me too long to make it look good to be a staple for everyday, I'm still looking for a decent daily one.


What is your favourite lip balm for winter?
I do own many lip balms but I don't have one that actually blows my mind. I'm wearing lipstick on a daily basis which is why I'm not using a lip balm very often when I'm not at home anyways, but I think my favourite of the ones I own is the Burts Bees Lip Balm with mango. The packaging isn't the greatest but it just works really well for me.


If you had to choose to wear one lipstick shade all winter what would it be?
I'd love to wear red everyday but I don't think I could pull that off. You need to be in a good mood and feel confident to make a red work and that's not really me at the moment. Not on a daily base, that is. I'd probably go for a red tinted lip balm.


Describe your most worn wintery make up look?
Natural smokey eyes (Urban Decay Naked palettes, yay!), cat flick and a nude-ish berry lipstick. 


What beauty product would you most like to try next?
Can't decide there! There's three products I'm really fighting not to buy: Essie's Tuxedo nail polish, a gorgeous super-dark red that's almost brown, the new YSL rebel nude glossy stains (SO nice!) and the matt topcoat by Butter London.


What are your favourite products in your current skin care routine?
Two products by Clarins, the HydraQuench Cream which is my daily moisturiser and the Lotus Oil which I use after I've cleansed my face. My skin is so dry these days, I feel like it's literally drinking the moisture.


What is your favourite winter scent?
Chanel Coco Mademoiselle. This scent is so elegant and lady-like that I can't imagine wearing it anytime else than winter because I like to dress quite casual in the warmer seasons. Plus, this is the only perfume my dad ever bought for me (he has a very sensitive nose) which is why it has a special place in my heart. :)


I want to tag everyone of you who reads this! Have fun doing it and please leave me your links or tweet them to me if you decide to do it.


Have a magical and wintery day!
xx


Sunday, December 1, 2013

Advent No.1: Best biscuits ever


Hey, fellow beauties!


Okay, sitting down to write this feels really weird. I've only been away for a month or so because my Uni courses were pure madness but to me it's like coming home from being away a much much longer time. Good to be back!

And what a coincidence (lie!), it's also the first of December. I do love December, it's the month where Christmas is and my birthday and New Year's Eve and it's winter and… you get me, right? 
This year the first of the month also happens to be the first Sunday in Advent. I don't know about all those of you who live in other countries than me, but the Sundays are a pretty big deal during advent in Germany, so I wanted to celebrate them a bit with you.
So, additionally to my usual uploads on Tuesday and Friday (hopefully I'll manage this time!), you'll get a Christmas-related post every Sunday until Christmas. Would you like that? (I'll do it anyways)


Let's begin!

Although I *really* should have been studying yesterday, it occurred to me that I hadn't baked anything so far. Not acceptable. 
So I whipped out my recipes and apron and started making my favourite christmas biscuits and while I threw flour round my kitchen - I'm a messy cook - I figured it would be cool to share that experience or at least the recipe with you.


First of all, you will need following things:


250 g flour
50 g sugar
1 pack of vanilla sugar
150 g butter
100 g marzipan (don't worry if you don't like it, no one in my family except me does and I have to make those biscuits for times every December…)
2 egg yolks
Funny stuff to decorate it all!


Alrighty! 
This is pretty easy: You need to take all ingredients except one yolk and the decor stuff, mix it all together and knead it all until it becomes a smooth dough. It's easier when the butter isn't too cold or too warm.
In the end, it should look something like this:


After that, you take your lovely lump of dough, put some cling film around it and let it rest in the fridge for at least 30 min so it can relax a bit.
Once you've done that, take it out again, let it warm a bit so it's easier to work with and roll it out (flour on the surface and the dough helps a lot with the stickiness!) until it's about 3 mm broad. 
Now the fun part begins! Takes whatever biscuit cutters you like and start being creative.


Depending on how long your oven takes, you might want to pre-heat it now on 175C in air circulation mode (that probably was a grammar fail :P). 
While the oven is heating up, take the other egg yolk, spread it on the biscuits and sprinkle everything over it you want! If you like icing on top of them, I would recommend putting that on after they're baked, though.
Let them bake for 10 - 12 min and tada!


I told you I was messy, didn't I?


Just a quick advice I had to learn the hard way: Do let them cool, don't give in to the temptation!


And that's it for my favourite biscuits! If you re-create them, let me know, tweet me pictures, whatever you want! And if you did a post on your favourite recipes - links please! I always enjoy trying new stuff.


Good to be back! Have a woooonderful day!
xx